Improve Your Gut Health with Kombucha
I wanted to improve my gut health so I started to experiment making kombucha at home a few months ago. Now I want to share my findings with you. This new discovery takes some time to finetune, but I can tell you this: I save a lot of money by not buying this drink from the store anymore.
Below you will see the recipe for home made kombucha. You will need a quart jar. This process takes a few days, you need to exercise your patience. In winter, the first phase fermentation may take 7-8 days. It takes less time in summer, maybe 2-3 days less, as the room temperature in my home climbs to 77-78F. A lot depends on how acid/ vinegary you like your drink. I usually taste the kombucha after about 5 days to check the acidity. This is not very scientific, see my video here. I got the starter (aka scoby…that white, jelly fish like material) from a friend. It needs to be at room temperature, do not put it in the fridge. This organism keeps growing, similar to the “friendship bread starter”, so you can make more than one batch in the future or share it with a friend. I keep the scoby and about 1 cup of the fermented tea (the mother kombucha) for my next batch. If you are in my area I can make some arrangements to get you some starter.
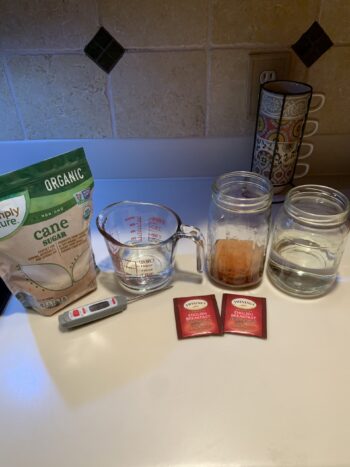
Ingredients for 1 quart/ 1 liter kombucha:
- 1-2 teaspoons of loose tea or 3 tea bags (black or green)
- 1 cup hot water to make the concentrated tea
- 1 scoby with some starter tea
- 3-4 Tbs cane sugar
- 2-3 cups water to top off the jar
Preparation
For the first fermentation, make a concentrated tea, steep for about 8 mins and add the sugar. Let the sugar dissolve, make sure the tea cools off to 90F or lower; you can add some of the cold water to speed up the process. Add the tea to a quart jar, then add the scoby and the starter tea, then the rest of the water to almost fill the jar. Cover the jar with a paper towel or cheese cloth and leave it on the counter for about 7 days. You may notice some tiny bubbles, that is part of the normal fermentation process. Here is a link to a YouTube video that shows the scoby and the ingredients.
Once the kombucha is done, you can flavor it with fruit. This is called the second fermentation. I use about a cup of fruit (raspberries, strawberries, blueberries or oranges), I puree it in the Magic Bullet blender and add a teaspoon of sugar or maple syrup. I get a 48 oz glass bottle or container (I saved some of the store bought Synergy brand kombucha) and put the fruit puree in it. I add the kombucha from the first fermentation, using a funnel and a strainer and saving the scoby and about a cup for a future batch. I use 1-2 cups of drinking water to clean up the blender and add that flavored water to the glass container. You will need to add more water, but don’t fill to the top. In the end, you want to have about 46 oz of this liquid mix in the bottle to leave about 2 inches of headspace. Tighten the cap on the bottle and let the mix ferment, using the sugar from the fruit. This second fermentation takes about 3 days, on the counter, after which the final kombucha should have a fizzy and fruity flavor and a nice color. I put the bottle in the fridge for 24 hours so that the carbonation is enhanced, then I get to enjoy the final product. You will see the fruit pulp raising to the top and sometimes a mini scoby growing. Use a strainer to filter the kombucha before consuming it.

